How to REALLY Use a Master To-Do List to Organize Your Life

We all have a lot of things to do. Sometimes, it can be hard to stay on top of them and we end up with tasks that are never completed.
The truth is, our brain is not a filing cabinet! Every time we look at something around the house, it triggers our brain to think about some related task or thing that needs to be done.
There’s no rhyme or reason to it, and it can feel like a million worried voices all trying to get our attention.
That’s no way to keep track of everything!
Instead of holding onto this weight in your head, hoping that you will remember to do them at the right time, you should create a master to-do list for organizing your tasks, and having a PLAN for doing them in an efficient manner.
This post will provide step-by-step instructions for creating and using a Master To Do List so you can get more done!
Why Do You Need a Master To-Do List?
Because you are BUSY! You know it, I know it, and I feel you.
Family, work, home, and everything else all need care and tending to in order to thrive.
To make the most of your time, you need to be able to organize and prioritize tasks. It’s also important that what you are working on is meaningful, not just busy-work.
it’s easy to get frustrated and discouraged when the day goes by & you feel like you didn’t do anything you were hoping to do. Life can start to feel out-of-control like that.
A running to-do list helps keep things organized by getting all your tasks out of your head, and into a structured system that will help move your tasks forward, and get them finished.
Let’s do it!
Supplies Needed
All you really need is:
- A notebook, and
- Two pens, in different colors.
The importance of having two different colored pens is so that you can easily see which tasks on your master to do list are done and have been checked or crossed off.
I love the erin condren pen holder, it slips right onto any notebook, and it keeps your pens all in one place. You’ll never go looking for a pen the next time a task pops into your head.

There are actually pretty cheap “list” type notebooks you can buy with the checkboxes printed on each line on the page, (like this one from Quill) but it’s really not necessary. You can use any notebook you have lying around.
Or, you can grab one of these super-cute notebooks I got at a great price from Erin Condren:


How to MAKE a Master To-Do List
This is VERY EASY I promise! Grab your notebook, and two (different colored) pens.
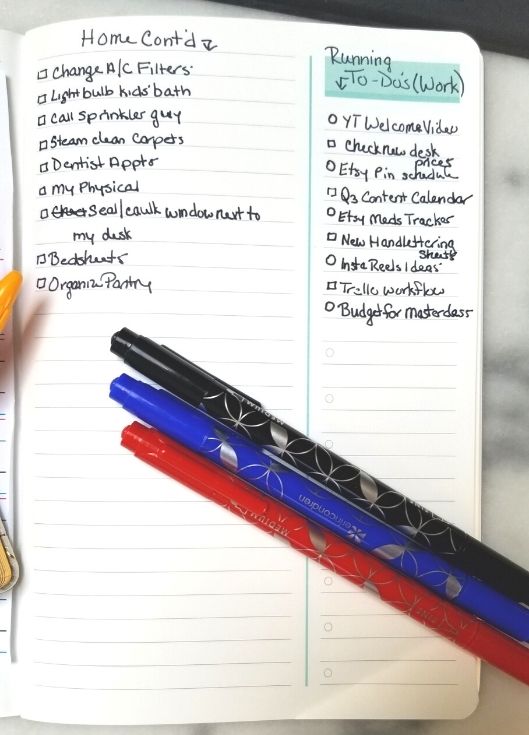
So there are THREE ways to format your pages:
- A straight running list, where you just write down each task one after the other, no matter if it’s a work task, home task, family task, etc.,
- Using a few columns to separate the tasks into the different categories of your life, or
- Using a multi-subject notebook, and use each section for each life category (home, school, business, etc.).

No matter which way you decide to do it, the idea is to have space for a running list. That means, you add to the list every time you think of something to do that can’t be done right then and there.
Once a task from the running to do list is done, you can check it off or cross it out, and keep adding new tasks to the bottom of the list. So, make sure your notebook has lots of pages to write on.
The BEST Tips to Use Your To Do List to Organize Your Life
This is how to organize your master to do list, and get the RIGHT tasks onto your planner:
1. Add to Your List Every Day
The reason you have this master to do list, is to keep all of your tasks out of your head, and into one place.
Every time there is something to do that can’t be done right away, like right now, you add it to the list.
No matter if it’s not-really-important-busy-work (changing a light bulb in a room no one really goes in) or if it’s part of your top priority goals of the year (cleaning out the basement), write it on the list.
This master to-do list becomes the thing you go to when you are planning your week.
2. Take Tasks From Your List to Put Into Your Planner Each Week, Using THIS Method
The most efficient and productive way to get your tasks into your planner is to put them into a hierarchy of most important to least important. Now, you do NOT have to rearrange your master to do list or anything like that.
A really simple way to decide where (or if) each task goes into your planner, is by using the Eisenhower Matrix.
I go into a LOT of detail about this in my post How to Plan Your Week For Maximum Productivity.
This post has a freebie that includes a Matrix already, or if you want a fillable planner & matrix that you can type into before printing, I have this one in my Etsy shop.

This method is not only going to help you get the RIGHT things done each week, but it’s going to make delegating a HABIT.
Delegating is the KEY to freeing up your time, getting the “have to’s” out of the way, and making room for the “want to’s.”
Basically, every task on your list can fit in to the following four categories:
IMPORTANT & URGENT: tasks that cannot wait, and you need to do them. These should be put in your planner early in the week (Monday or Tuesday)
IMPORTANT & LESS URGENT: tasks that definitely should be done this week, but not right now this second. These can be sprinkled throughout the rest of the week.
NOT IMPORTANT & URGENT: tasks that really should be done now, but are more busy-work than important. These tasks should be given to someone else to do if possible.
NOT IMPORTANT & NOT URGENT: you wrote them on your master to do list, but it’s just not something you need to bother yourself or anyone else with.
Again, I go into much better detail in this post, but here is what you do:
1. Decide beforehand how much time you can commit to doing tasks each day of your week. Make sure you check your calendar, you may have a meeting or event.
Also, be realistic about your time….don’t just squeeze as much as you can into every day, aim for two or three big tasks that you’ll feel happy about checking off.
2. Go through your master to do list, starting at the beginning of the list, and place as many tasks as will fit into one of the boxes of your Matrix. Scanning your inbox for coupons? Definitely Box 4. Cleaning the bed sheets? Probably Box 2 or 3.
3. Once your matrix is full, put a mark on your master to do list next to the tasks that were put in Box 3 (delegate), with the first initial of the person who is doing that task.
4. Front-load your week (Monday & Tuesday) with your Box 1 tasks, and sprinkle your Box 2 tasks throughout the rest of your week.
3. Check Off or Cross Off on Your Master To-Do List (in a different color than what you wrote in) The Tasks That Made it To Your Planner This Week.
Now they’re in your planner, and that’s where they are going to live until they are done.
If you want to see how I keep track of the tasks I put into my planner so nothing gets forgotten, next week’s post is going to be all about that! Make sure you’re signed up to my email list & I’ll let you know when the post is on the blog!
4. At the End of Every Day, Review What You Accomplished and Make Adjustments.
This is the time to see if you scheduled too many, too little, or just the right amount of tasks into your week.
Think about getting to a sort of harmony where you feel like things are getting done, PLUS you have some time for your “wants.”
Also check in with the people in your house you gave tasks to, so you can check off those tasks on your master to do list.
5. Use This System Every Week, Starting With The Earliest to The Most Recent Tasks.
Soon, you’ll be reveling in all of the beautiful check marks/cross-offs, and feeling like your days are productive and smooth 🙂
What To Do When Your List Feels Too Overwhelming
When your tasks in your running to do list start to pile up and it feels too overwhelming, try one of these tricks to kick-start some movement in your day:
1. Try completing the smallest, easiest task on your list, and check it off with your pen. This can give you some momentum for getting another task over with.
2. Use the “15 minute rule.” Set a timer for 15 minutes and just straight-up ATTACK the first task on your planner that day. Once the timer goes off, you can give yourself a breather, but it’s more likely that you’ll continue on the task since you got the ball rolling already.
3. Your body may be telling you it needs to take a little break. Ask your partner, kids, a friend or family member, etc. to do part or all of the biggest thing on your list for you, because you’re really feeling burnt out.
However much time that task was supposed to take, give that time to yourself and take a quick nap, take a walk, exercise, or anything else that helps fill your cup back up.
4. Do a random five-minute tidy with the whole family when everybody’s home. I love doing this, because it is super short, everybody’s running around when the timer goes off, and when it’s done your space is significantly more orderly and less decluttered.
5. Be realistic about how much time it will take for each task. Make sure you are not overloading your planner. Don’t try to tackle too many things at once or they will pile up and overwhelm you!
6. Reward yourself after completing each task by taking a short break (for example, going outside for 10 minutes) before moving on to the next task.
7. Reward yourself when you complete an entire section of tasks! Once you’ve gotten through a whole page of master to-do list tasks in a week or two, give yourself a nice reward, you did an AMAZING job!
Master Your To Do List & Win Your Week!
I hope you found this article on how to make and use a master to-do list helpful.
And remember, the key to getting things DONE is finding the right balance of tasks that are meaningful but manageable for your life stage, so you don’t overwhelm yourself.
XO,
-Mina
P.S.: Here Are More Posts I Know You’ll Find Useful: